Light and dark color schemes with SVGs
When doing diagrams of various sorts for blog posts, I like to use the SVG format. Vector images work well for diagrams, since diagrams involve simple shapes, lines, and text, and those are all things that vector graphics are good at. The SVG (Scalable Vector Graphics) format is—at least at the basic level—widely supported by modern browsers, making it a good choice.
Internally SVGs are XML documents, and, when viewed in a Web browser, there are ways in which they behave similarly to HTML documents. For one, SVGs support CSS—not in the same exact way as HTML, since SVG elements and HTML elements are not the same—but in ways that are often similar. One feature of CSS-as-used-in-HTML that CSS-as-used-in-SVG supports is prefers-color-scheme media queries. This means that SVGs can adjust to dark and light schemes with CSS alone. This actually works—at least in Firefox and Chromium—even when the SVG is included in a document via an <img> tag (which otherwise limits what SVGs can do). An example SVG image that makes use of this follows:

A simple SVG drawing which, by default, depicts a day scene; if prefers-color-scheme is dark, though, the scene depicted is at night
The end goal
Diagrams tend to feature elements with consistent styling: boxes with the same kind of border, text labels with the same font, arrows with the same line thickness. In this situation—just like with HTML—it makes sense to give SVG elements semantic class names, or at least names that reflect reusable styles, and then write CSS rules based on those classes. A (non-diagram) example of this:
<svg
  viewBox="0 0 100 100"
  xmlns="http://www.w3.org/2000/svg"
>
    <style>
        .sky {
            fill: skyblue;
        }

        .sea {
            fill: dodgerblue;
        }

        @media (prefers-color-scheme: dark) {
            .sky {
                fill: midnightblue;
            }

            .sea {
                fill: darkblue;
            }
        }
    </style>
    <rect class="sky" x="0" y="0" width="100%" height="100%" />
    <rect class="sea" x="0" y="65" width="100%" height="35" />
</svg>
A simplified version of the seascape SVG. The sky and sea have classes assigned, and a separate <style> element assigns colors to them based on user agent's preferred color scheme.
Authoring SVGs entirely by hand is, however, a tricky proposition. There are tools like Mermaid which will, indeed, output SVGs that use classes and separate stylesheets for easier restyling. However, I like to author my SVGs with Inkscape, as it is a full vector image editor, and so it offers more flexibility than tools designed for authoring specific kinds of diagrams.
Inkscape and SVG sources
Inkscape is a What You See Is What You Get editor. Because of this, it does not produce output where objects have consistent classes and where stylesheets are easy to apply. Indeed, it is is not really designed with editing the XML source of an SVG as part of the most common workflow.
Nevertheless, Inkscape actually does feature an XML source editor. The XML editor panel is available under the Edit ▸ XML Editor… menu entry.
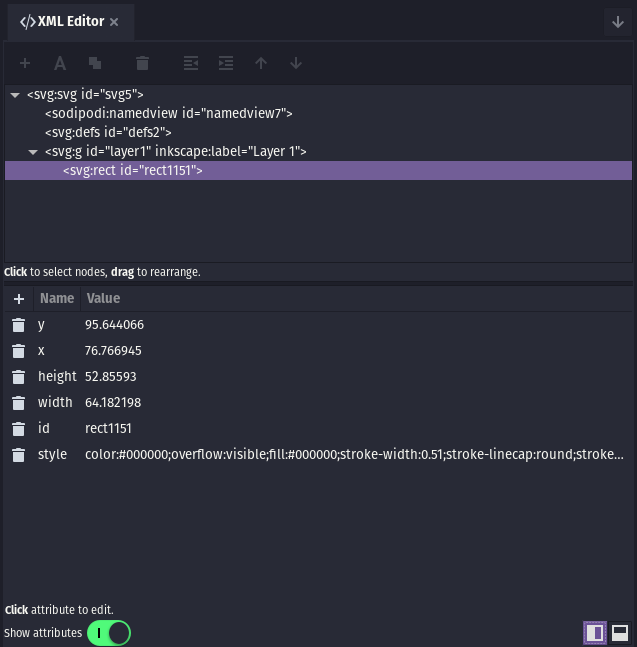
The XML editor inside Inkscape
Inkscape also has a newer CSS editor, which can be accessed via Objects ▸ Selectors and CSS…. This editor somewhat resembles the element inspector you might find in a web browser, and actually allows assigning classes to elements, as well as adding CSS rules based on class selectors.
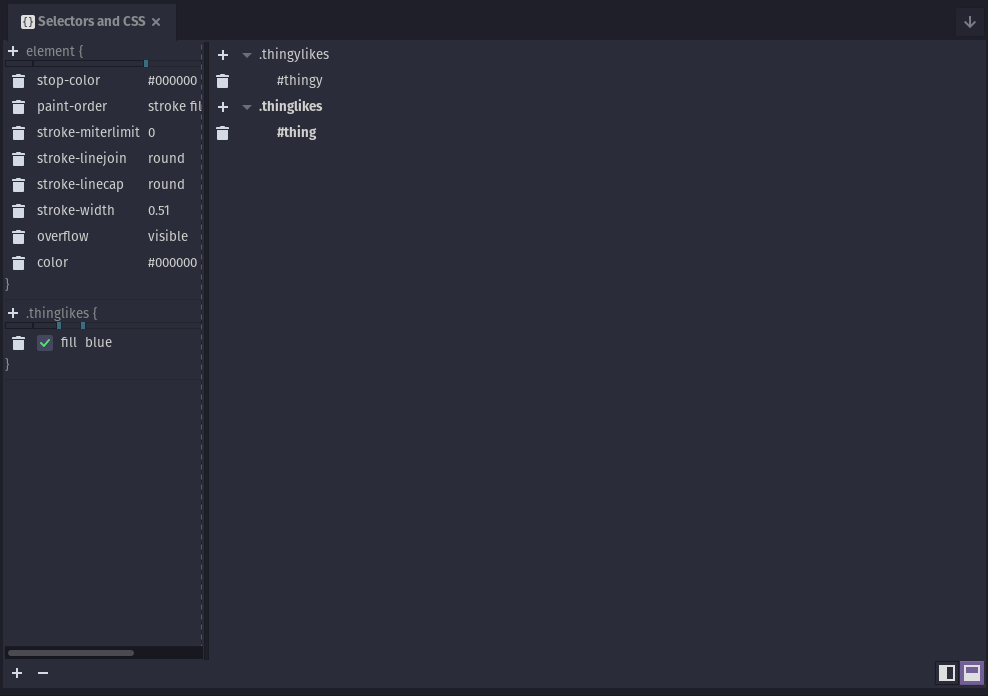
The newer CSS editor, showing two classes, each with one member. One of the member elements is selected, and its styles are shown in the left pane.
It is also possible to edit an SVG simultaneously in Inkscape and an external text editor. Inkscape will do mostly fine with rendering externally modified files (provided they're valid SVG), and will pass-through copy such modifications without rewriting them, unless a particular element is modified within Inkscape. It will not live-reload externally modified files—this is something the user has to remember to do themself.
My SVG authoring workflow
By default, Inkscape will not assign classes to new elements. It will, on the other hand, enthusiastically assign styles on element level. When I am drawing a diagram, I generally do not care about setting these element-level styles, other than temporarily, in order to preview how I want things to look in the end. Copying and pasting styles between elements is what I am trying to avoid, though.
I like to use Inkscape's alternate display modes. Through View ▸ Display Mode, Inkscape can be set to display all elements as outlines, or to display elements as normal, but add extra outlines to them. This is useful for laying things out, even if their current styles make it less obvious where things are, and where they end.
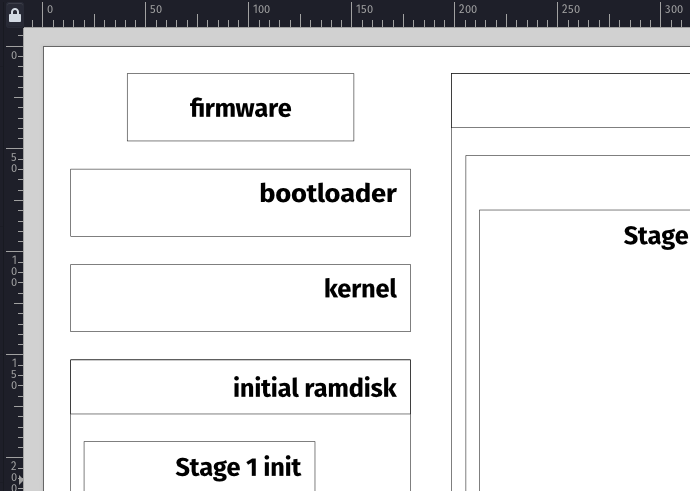
Inkscape displaying an image in outline mode. Paths and shapes are shown as outlines, even if they otherwise have fill colors, and even if they would normally cover each other.
Once an element is mostly where it needs to be, I use the XML editor to give it a class or an id. Just like with HTML elements, SVG elements can have both any number of classes, as well as a unique id. Inkscape does automatically assign everything ids, in a pattern like path1234; the id can be edited later from the XML editor, or the Object Properties dialog. Note that Inkscape also has its own labels, stored under the inkscape:label attribute—this is the name that objects show up under in the layer editor, but it is distinct from the id attribute.
When elements have some classes assigned, I open the SVG file in a text editor, and start adding a light-theme stylesheet under a <stye> element (directly under the <svg> element). As with ordinary HTML, the default prefers-color-scheme is assumed to be light, so starting with a light theme by default, and then adding a dark one is an approach that makes sense.
At this point, I generally also open the SVG in a web browser. In theory, SVGs should render the same everywhere, but checking is still a good idea. An SVG viewed in a browser can also be easily refreshed, to show the most recent changes.
Inkscape, on the other hand, can be forced to reload the SVG via File ▸ Revert. I try to save before moving out of Inkscape, and revert when moving back into it, so that I do not accidentally discard useful changes made in one program by saving over it in another (though text editors are better about handling changes made elsewhere).
Once I have something in a dark-on-light scheme that looks okay, I start writing the light-on-dark version. I generally enclose the whole set of dark-themed styles behind a @media (prefers-color-scheme: dark) query, though it is possible to intersperse such overrides at multiple points in the sheet. The web browser preview becomes useful at this point, as Inkscape will not read the styles behind the media query. As I normally use a light-on-dark desktop theme (and so my Firefox prefers a dark color scheme), I get a preview of what is behind the media query. Firefox's Element Inspector has handy buttons for forcing prefers-color-scheme to dark or light, which is useful for making sure that everything in the light theme still looks okay afterwards. The Element Inspector can actually also inspect SVG elements in the same way as HTML elements, including modifying their styles.
Ordinary Inkscape SVGs leave a bunch of Inkscape-specific stuff in the file, useful for editing, but less useful for display. Inkscape also tends to leave unused things in the file—for example, gradients which were applied to an object that was later deleted. This is fine as far as rendering in browser goes, but ideally, the SVG served over the web should not contain a bunch of stuff that will never be used. To that end, Inkscape has the option of saving files as "Plain SVG" (as opposed to "Inkscape SVG"), as well as the option to clean up unused stuff (under File ▸ Clean Up Document). I like to process Inkscape SVGs with SVGO, a separate external tool for optimizing SVGs, which also gets rid of redundant or unnecessary things. Inkscape does have a built-in optimizing functionality—when saving as "Optimized SVG", Scour is applied to the file—so the use of SVGO here is a preference.
Alternatives
SVGs with media queries in them do not seem very common in the wild. There do exist other ways of adapting images to dark and light color schemes. A common, idiomatic one under HTML is to use <picture> with <source>s conditional on a media query:
<picture data-needs-lightbox>
    <source srcset="dark-version.svg" media="(prefers-color-scheme: dark)">
    <img src="light-version.svg" alt="Some sort of a fancy drawing">
</picture>
Example of <picture> use, where the alternate <source> gets used based on a prefers-color-scheme media query. This technique also works with non-SVG, raster images.
Although this approach requires two separate SVG files—which presumably duplicate geometry, while changing the style—a browser will normally not download any of the sources besides the selected one.
Fancier solutions often involve using JavaScript to query the current prefers-color-scheme, and then dynamically loading content based on that. The downside to this is that it requires the user agent to consent to running JavaScript, or fail to load the color scheme–specific content. If possible, it is generally better to use the above methods, which do not require running scripts.