Tiling isometric tiles
I recently wrote a library in Rust which generates a random terrain consisting of blocks (think Minecraft or Minetest), and renders it in isometric perspective. It's called cubeglobe, and its source is available on Github. The library was written to be used by a Fediverse bot, which posts these randomly generated landscapes on a relatively regular basis. You can check out the bot's feed if you want some examples of what this looks like.
In the process of writing cubeglobe, I had to figure out how to actually render these images, given an internal representation of the landscape, and a handful of tile sprites corresponding to the different block types that the internal representation can feature. This is not a very unique problem—representing various sorts of maps using isometric tiles is something that video games have been doing for decades. In fact, my problem was somewhat easier, since I did not have to worry about interactivity, while video games generally do. Nevertheless, I did have to figure out how to do it, and these notes detail that.
The 2:1 dimetric projection
A common way of doing isometric graphics on a computer, especially when you're doing something on the more pixel art end of the spectrum, is to use the 2:1 pixel ratio. This is technically not an isometric projection, but a dimetric one (you can read more about it in an otherwise interesting Wikipedia article). This projection has the benefit of making it easy to draw lines—they go one pixel up, two pixels laterally, hence the 2:1 ratio. Figure 1 illustrates what this looks like.
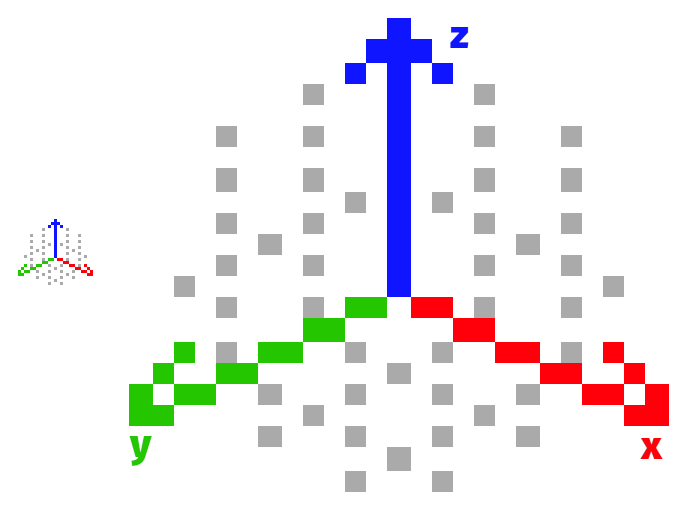
Figure 1: The axes in a 2:1 projection
The figure also marks the axes in the world coordinates. As with any projection system, it is useful to be able to say when you're referring to screen coordinates, and when you're talking about world coordinates. Screen coordinates are used to refer to individual pixels in your output image, while world coordinates are used to refer to where in your scene a given object is.
Two dimensional tiles
If you draw a flat square in this dimetric projection (that is, a square on the x-y world plane), its screen width will be twice its screen height. This makes calculations for tiling such squares somewhat easier: the sprite has a height of n, and a width of 2n. When you offset the sprite to tile it in a grid, you offset it by a multiple of n.
How do we tile these tiles, then? To move by one tile in the world x direction, we move it down by half of the tile's screen height, and to the right by half of the tile's screen width. This comes out to moving it by n/2 in the vertical direction, and n in the horizontal direction. To move one tile in the world y direction, it's the same story, except we move to the left instead of right. To move diagonally, we shift down by a full tile's height, n, in the vertical. Figure 2 shows a simple example.

Figure 2: Tiling in two dimensions.
Applying these principles. We arrive at formulas for getting the screen coordinates from the world coordinates, seen in Listing 1. The assumptions are that the tile dimensions are 1×1 in the world coordinates, and that the 0, 0 tile in world space is also at 0, 0 in screen space.
screen_x = ( world_x - world_y ) × n
screen_y = ( world_x + world_y ) × n/2
Of course, the fact that these screen coordinates have the 0, 0 tile as the origin means that we may have to figure out where to place the 0, 0 tile on the screen. The formulas can help here, too: figure out how many tiles we want to the left of the origin tile, and use the formula to figure out how many pixels will be needed to the left of the origin tile to fit everything.
Adding a dimension
cubeglobe maps are three-dimensional—they represent cube blocks, instead of flat tiles. This means that we also need to figure out how to place tiles depending on their z-axis coordinate in the world space.
The easiest way to think of cuboid tile sprites is to think of them as a flat tile with the z-axis component either below it or above it. In other words, take your existing flat tile and draw a cube, either on top of it, or below it. cubeglobe, in particular, aligns tiles by their tops, so that means its tiles are a flat tile with the cube below it.
So, how much do we shift in the screen space to shift by one level in the world coordinates? To figure that out we must know the height of our sprite—let's call this h. Recall that the flat dimetric tile has screen space dimensions of 2n by n. This remains true even as we move to representing cubes: the tile on top of the cube is still 2n by n. The pixel height we need to shift by is equal to the height of the sprite that remains after we take away the height of the tile on top: h-n.
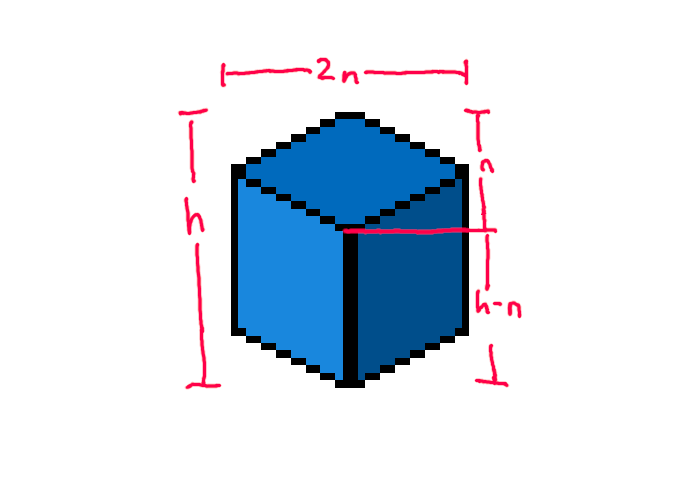
Figure 3: The top and sides of a block, and their dimensions.
It's worth pointing out here that while it may be tempting to make the block sprite a square, it does not work very well. If the total height is 2n, then the amount we would shift for a new z-level would be n. We also shift by n for some situations when operating on the same z-level, so we end up with a situation where it is hard to tell if something is above or behind, as seen in Figure 4.
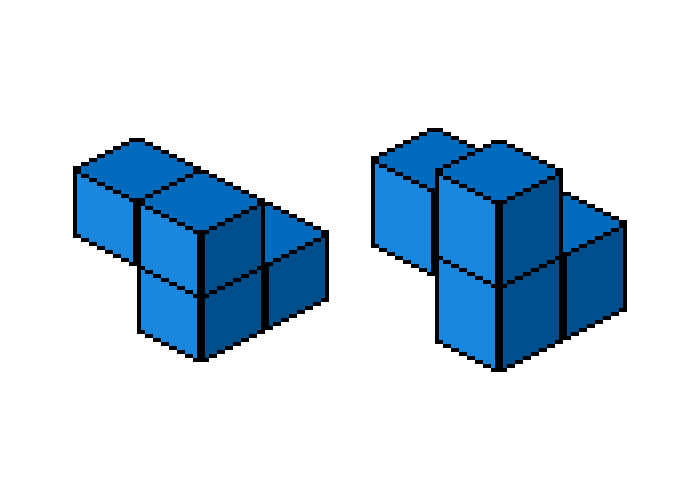
Figure 4: The blocks on the left have a square sprite, and it is difficult to tell what is in front. The blocks on the right are a bit taller, and arranged the same as the ones on the left, but their layout is easier to see
Correctly drawn cubes in this perspective are actually slightly taller than square. While a mathematically accurate projection is not required to make things look like cubes, having the sprite be rectangular does help in differentiating between the background and the foreground, visually.
Blocks upon blocks
cubeglobe renders its landscapes by repeatedly drawing the blocks one-by-one, from the lowest level to the highest. This is obviously not the most efficient way to do this—a large number of blocks are going to be occluded by other blocks, and thus never seen on screen—but it is quite simple.
Each level can be drawn row-first or column-first, starting from the lowest coordinates. The blocks with the lower coordinates are going to be behind the blocks with the higher coordinates, so we can simply draw them in the right order. Each level can then be layered on top of the previous one—the lower level will be occluded by the higher one.
cubeglobe does not employ any concurrency, although it would theoretically be possible to, for example, draw each layer separately and then combine them in order, afterwards. The overhead may not be worth it, though, and it would require some exploration in practice.
Conclusions
I wrote cubeglobe partly because I was wondering how hard it would be to draw isometric graphics like that, given no prior knowledge. Turns out it is not very hard, although it does require figuring out the formulas above. Fortunately, these sorts of graphics have a long history of use in video games, so it is not particularly hard to find useful resources.
Despite a rather inefficient way of drawing things, cubeglobe is not incredibly slow. This was something of a pleasant surprise.
Actually generating landscapes is an entirely separate problem, of course, and not covered here. With block-based landscapes like these, however, the internal representation can be fairly simple, which makes it easy to separate the rendering side from the generating side.
Further reading
- "Isometric Tiles Math" by Clint Bellanger – Probably a far better explanation of how to tile tiles in two dimensions, along with some extra stuff for translating screen coordinates to world coordinates.